Phantom 4 Pro is really going to put professional quality, cinematic shots into the hands of consumers. It can record at 4k video at 60 frames per seconds. This means it can record slow motion in 4k which gives your video a much smoother look. After the video capture, you may going to have some professional post work-flow of the Phantom 4 Pro video files with Windows Movie Maker. However, H.264 encoded MP4 or MOV file format from DJI Phantom 4 Pro is beyond the compatibility of Movie Maker. What's more, handling 4K files in Movie Maker is usually hardware intensive. Thus, you can't get a flawless 4K workflow in most cases. 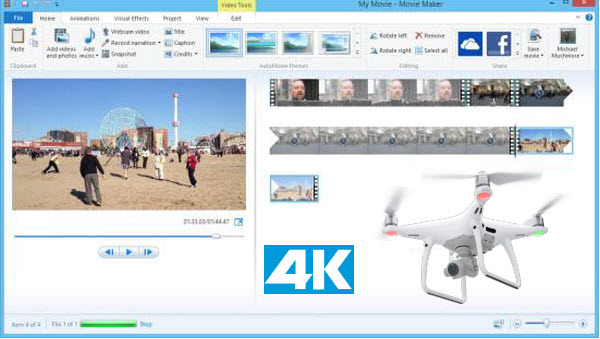 Is it possible to edit 4K videos from Phantom 4 Pro with Windows Movie Maker? If your computer meets below listed requirements, you will have no problem to work 4K video with Windows Movie Maker: * Integrated Graphics solutions that support 4K external displays (8GB RAM recommended with integrated graphics solutions): * 4th generation Intel Core processor family (Intel Haswell based CPUs) – (Intel Iris Pro Graphics 5200 / Intel Iris Graphics 5100, Intel HD Graphics 5000 / 4600 / 4400 / 4200) * AMD A10-7800 APU If your system does not support the 4K videos, there is no point even if you have the latest software version. Majority of videos are finished in 1080p and thus it is always advisable to downscale or render your 4K video into a 1080p file so that they can be easily edited in Windows Movie Maker. However, that does not mean that you can throw any 4K video to Windows Movie Maker, the 4K video should be listed in Windows Movie Maker supported formats list as below: Video formats: WMV, ASF, WM, M2TS, MTS, M2T, MOV, QT, DVR-MS, WTV Audio formats: ASF, WM, WMA, AIF, AIFF, WAV, M4A, MP3 Since DJI Phantom 4 Pro 4K videos are with the format of MP4, Windows Movie Maker will fail to handle those 4K file formats. Actually, it's not as difficult as you imagine. To edit Phantom 4 Pro 4K H.264 MOV/MP4 video in Windows Movie Maker, the easy workaround is to convert DJI Phantom 4 Pro 4K to Windows Movie Maker compatible formats like WMV or AVI. What you need is just a common 4K video converter like Dimo Video Converter Ultimate. It supports creating high quality WMV video for your Windows Movie Maker. It can convert DJI Phantom 4 Pro 4k videos to WMV so you can import your video to Windows Movie Maker for editing. It is now providing the most reliable and professional 4K solutions to all format issues including 4K Blu-ray, 4K XAVC/XAVC S, 4K H.265, 4K MP4, 4K MOV, 4K MTS, 4K MXF, 4K AVI, 4K MKV and more. Now download the program and start converting your DJI Phantom 4 Pro 4K videos. Free Download Dimo Video Converter Ultimate (Win/Mac):
 Other Download:
Convert DJI Phantom 4 Pro 4K video for editing in Windows Movie Maker Step 1. Load Source Video Launch the 4K to 1080p Converter; click "Add File" and load your 4K HD files from DJI Phantom 4 Pro. If necessary, you can double click the video for previewing.
Other Download:
Convert DJI Phantom 4 Pro 4K video for editing in Windows Movie Maker Step 1. Load Source Video Launch the 4K to 1080p Converter; click "Add File" and load your 4K HD files from DJI Phantom 4 Pro. If necessary, you can double click the video for previewing. 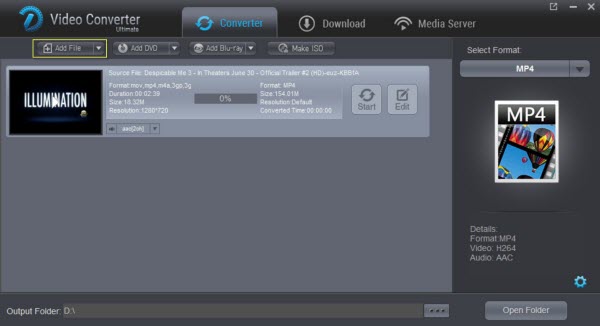 Step 2. Decide Output Format Hit the "Select Format" box and select "Format > Editor > Movie Maker or choose HD WMV from "Format —> HD Video" on the dropdown menu as output format. Besides, you can also choose Divx HD(*.avi) as output if you have not installed the .wmv codec.
 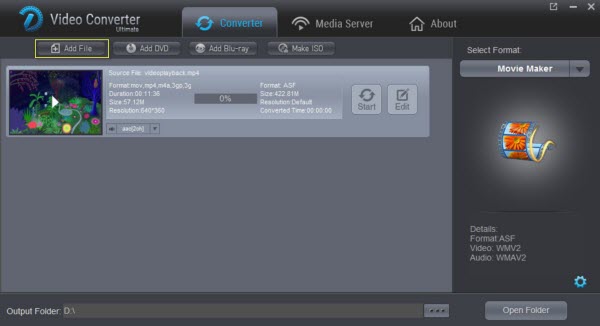 And by clicking Edit, you can trim, crop videos, adjust video effects, add watermarks, etc. Trim: Allowing users to decide where to start and where to end when converting the selected clip, so that unwanted segments will be cut out after conversion. Adjust: Getting rid of the black edges and unwanted area of the image. Watermark: Here, you can create a text watermark to personalize your video. Effect: Customize the output effect. Here, you can apply emboss, sharpness, invert or mosaic effects and apply a number of deinterlacing options. Step 3. Set Video Resolution at 1080p Click "Settings" button; you can adjust video and audio settings, including codec, aspect ratio, bit rate, frame rate, sample rate, and audio channel. To down-convert ultra HD 4K MP4 to 1080p WMV, do remember adjusting video size to 1920*1080. That is the exact 108p. Step 4. Start Phantom 4 Pro 4K MP4 to 1080p WMV Conversion Hit "Start" button to let the Phantom 4 Pro 4K MP4 to WMV for Windows (Live) Movie Maker 1080p WMV conversion begin. When the conversion finished, check the generated 1080p video, you will certainly be satisfied with its final video quality. It would be easier for you to edit DJI Phantom 4 Pro in Movie Maker, and then playback or share everywhere you like. Free Download or Purchase Dimo Video Converter Ultimate:
 Need the lifetime version to work on 2-4 PCs so that your friends and family can instantly broaden their entertainment options? Please refer to the family license here.
  Kindly Note: The price of Dimo Video Converter Ultimate for Windows is divided into 1 Year Subscription, Lifetime/Family/Business License: $43.95/Year; $45.95/lifetime license; $95.95/family license(2-4 PCs); $189.95/business pack(5-8 PCs). Get your needed one at purchase page. Related Software: BDmate (Win/Mac) Lossless backup Blu-ray to MKV with all audio and subtitle tracks; Rip Blu-ray to multi-track MP4; ConvertBlu-ray to almost all popular video/audio formats and devices; Copy Blu-ray to ISO/M2TS; Share digitized Blu-ray wirelessly. DVDmate (Win/Mac) A professional DVD ripping and editing tool with strong ability to remove DVD protection, transcode DVD to any video and audio format, and edit DVD to create personal movie. Videomate (Win/Mac) An all-around video converter software program that enables you to convert various video and audio files to formats that are supported by most multimedia devices. 8K Player (Win/Mac) A mixture of free HD/4K video player, music player, Blu-ray/DVD player, video recorder and gif maker. Contact us or leave a message at Facebook if you have any issues. Related Articles:
Source: Editing DJI Phantom 4 Pro 4K videos in Windows Movie Maker easily
Kindly Note: The price of Dimo Video Converter Ultimate for Windows is divided into 1 Year Subscription, Lifetime/Family/Business License: $43.95/Year; $45.95/lifetime license; $95.95/family license(2-4 PCs); $189.95/business pack(5-8 PCs). Get your needed one at purchase page. Related Software: BDmate (Win/Mac) Lossless backup Blu-ray to MKV with all audio and subtitle tracks; Rip Blu-ray to multi-track MP4; ConvertBlu-ray to almost all popular video/audio formats and devices; Copy Blu-ray to ISO/M2TS; Share digitized Blu-ray wirelessly. DVDmate (Win/Mac) A professional DVD ripping and editing tool with strong ability to remove DVD protection, transcode DVD to any video and audio format, and edit DVD to create personal movie. Videomate (Win/Mac) An all-around video converter software program that enables you to convert various video and audio files to formats that are supported by most multimedia devices. 8K Player (Win/Mac) A mixture of free HD/4K video player, music player, Blu-ray/DVD player, video recorder and gif maker. Contact us or leave a message at Facebook if you have any issues. Related Articles:
Source: Editing DJI Phantom 4 Pro 4K videos in Windows Movie Maker easily
The .wmv (Windows Media Video) is the main format used in all videos processed and saved using the Windows system and its video tools such as Windows Movie Maker. Can't upload WMV to YouTube? Why WMV files can't be recognized by YouTube, while it's officially said that WMV is. See the reason and solution to upload WMV to YouTube effortlessly.  First, let's see YouTube supported formats. Generally speaking, YouTube fully supports MP4, AVI, WMV, MPG, FLV, 3GP, MOV, and WebM files. If your WMV file is not encoded with the video and audio codec mentioned in this article, it won't be accepted by YouTube. To upload WMV to YouTube successfully, you have to convert WMV to YouTube-supported formats first. For this purpose, an easy-to-use yet powerful tool - Dimo Video Converter Ultimate or Dimo Videomate is introduced in this guide. Best WMV to YouTube Converter to Upload WMV Videos to YouTube Videomate is an exceptional tool that allows you to convert videos and audios directly to The process is simple and quick. All you need to do is to upload the file to the program, select format and convert it for uploading to the desired sharing sites. Moreover, Videomate is a solution to all your video and audio conversion. It is also built with a video player, video editor, media server and an ISO maker. In addition, as known to all, YouTube won't accept a file exceeding 10 minutes. If your WMV file is too long to upload, this app can also let you split it to the specific length easily. Next, I'll show you the whole process. It's really simple, just four steps.More features: * It supports Blu-ray, DVD, ISO, video formats like WMV, AVI, MKV as well as audio formats such as MP3, MKA, AIFF, AAC, and M4A. * Edit videos where you can crop, trim, and cut videos into smaller sections you are interested in. * It allows for personalization of videos where you can add subtitles and watermarks or other effects to video. * Compatible with different devices like Samsung, Apple, Androids, TV, VR devices and game hardware. If you are Mac users, please get Dimo Video Converter Ultimate for Mac/Videomate for Mac which are compatible with macOS 10.12 Sierra, 10.11 El Capitan, 10.10 Yosemite, 10.9 Mavericks, 10.8 Mountain Lion and 10.7 Lion. This article will teach you a step-by-step solution converting/uploading MKV to YouTube for sharing. Free Download Dimo Video Converter Ultimate (Win/Mac): Other Download:
Guide: How to convert WMV to YouTube format Step 1. Import WMV files Launch the WMV converter; drag & drop .WMV files to it. Or click the "Add File" button to locate the files you want to add. Note that batch conversion is supported so you can add as many files as you like one by one and convert them at one time.
First, let's see YouTube supported formats. Generally speaking, YouTube fully supports MP4, AVI, WMV, MPG, FLV, 3GP, MOV, and WebM files. If your WMV file is not encoded with the video and audio codec mentioned in this article, it won't be accepted by YouTube. To upload WMV to YouTube successfully, you have to convert WMV to YouTube-supported formats first. For this purpose, an easy-to-use yet powerful tool - Dimo Video Converter Ultimate or Dimo Videomate is introduced in this guide. Best WMV to YouTube Converter to Upload WMV Videos to YouTube Videomate is an exceptional tool that allows you to convert videos and audios directly to The process is simple and quick. All you need to do is to upload the file to the program, select format and convert it for uploading to the desired sharing sites. Moreover, Videomate is a solution to all your video and audio conversion. It is also built with a video player, video editor, media server and an ISO maker. In addition, as known to all, YouTube won't accept a file exceeding 10 minutes. If your WMV file is too long to upload, this app can also let you split it to the specific length easily. Next, I'll show you the whole process. It's really simple, just four steps.More features: * It supports Blu-ray, DVD, ISO, video formats like WMV, AVI, MKV as well as audio formats such as MP3, MKA, AIFF, AAC, and M4A. * Edit videos where you can crop, trim, and cut videos into smaller sections you are interested in. * It allows for personalization of videos where you can add subtitles and watermarks or other effects to video. * Compatible with different devices like Samsung, Apple, Androids, TV, VR devices and game hardware. If you are Mac users, please get Dimo Video Converter Ultimate for Mac/Videomate for Mac which are compatible with macOS 10.12 Sierra, 10.11 El Capitan, 10.10 Yosemite, 10.9 Mavericks, 10.8 Mountain Lion and 10.7 Lion. This article will teach you a step-by-step solution converting/uploading MKV to YouTube for sharing. Free Download Dimo Video Converter Ultimate (Win/Mac): Other Download:
Guide: How to convert WMV to YouTube format Step 1. Import WMV files Launch the WMV converter; drag & drop .WMV files to it. Or click the "Add File" button to locate the files you want to add. Note that batch conversion is supported so you can add as many files as you like one by one and convert them at one time. 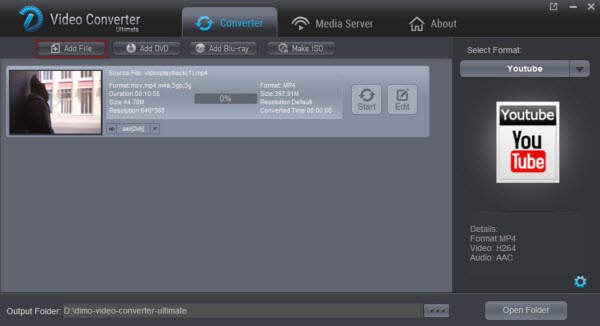 Step 2. Select output format Click Select Format bar to select an output format. To share your WMV movies on YouTube, YouTube video from "Format > Web" are all the proper formats. You can also press the Settings button to adjust the video size, bitrate, frame rate, audio sample rate, etc to optimize the quality.
 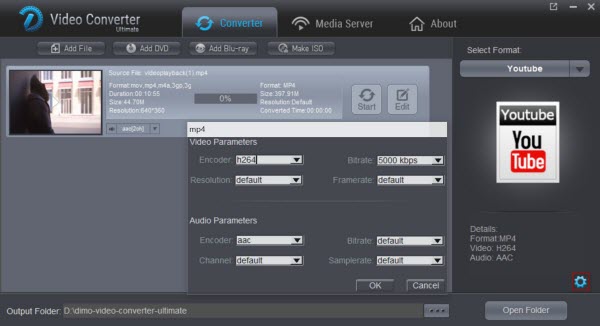 Step 3. Edit WMV for YouTube(optional) Click Edit button and you can trim, crop or adjust the video with the built-in video editor to get the very part and effect of the movie you want. And if the video clips you've trimmed are still longer than 15 minutes, you can choose "Add Trim Marker" to split the WMV video into smaller parts so as to share on YouTube without limit.
  Step 4. Start the conversion Click "Start" button to start converting WMV video for uploading to YouTube. After the conversion, click "Open" button to get the exported files and then upload the converted WMV files into YouTube for sharing with your friends, families, and fans with below steps. How to Upload WMV Video to YouTube With the following guide, you should be able to upload WMV video to YouTube. Step 1: Sign in to your YouTube account. Enter your email address and password or any credentials that you use to access your YouTube account. Step 2: On YouTube page, click the “Upload “button. It directs you to choose a file to upload. Step 3: Tap on "Select file to upload" it leads you to the files in your computer. Pick on the WMV file that you want to upload.Step 4: Edit you video; enter the title and give its description in the description box. You can also put tags in for people to find your photo. Save changes after you done with it. Step 5: Choose the privacy settings. You can choose to edit the basic and advanced settings too. Step 6: Finally click the "Upload" to finish uploading your converted WMV file. Where you selected private or unlisted settings, you need to click "Done" to complete the upload. Free Download or Purchase Dimo Video Converter Ultimate: Need the lifetime version to work on 2-4 PCs so that your friends and family can instantly broaden their entertainment options? Please refer to the family license here. Kindly Note: The price of Dimo Video Converter Ultimate for Windows is divided into 1 Year Subscription, Lifetime/Family/Business License: $43.95/Year; $45.95/lifetime license; $95.95/family license(2-4 PCs); $189.95/business pack(5-8 PCs). Get your needed one at purchase page.
Related Software: BDmate (Win/Mac) Lossless backup Blu-ray to MKV with all audio and subtitle tracks; Rip Blu-ray to multi-track MP4; ConvertBlu-ray to almost all popular video/audio formats and devices; Copy Blu-ray to ISO/M2TS; Share digitized Blu-ray wirelessly. DVDmate (Win/Mac) A professional DVD ripping and editing tool with strong ability to remove DVD protection, transcode DVD to any video and audio format, and edit DVD to create personal movie. 8K Player (Win/Mac) A mixture of free HD/4K video player, music player, Blu-ray/DVD player, video recorder and gif maker. Contact us or leave a message at Facebook if you have any issues. Related Articles:
Source: How to Upload WMV to YouTube Effortlessly
Tivos are great for time-shifting TV shows, but can place-shift them as well! If you've recorded many TV shows with TiVo and now you want to transfer them to your new iPhone 7 for kiiling time on the move, check out the solution here.  From what I have seen on the Tivo blogs, neither iTunes nor iPhone 7 is not compatible with Tivo files since all TiVo files are DRM protected. This is why iPhone 7 can't recognize TiVo from iTunes directly. Don't worry. Let's try some easier and quicker way here: transcode TiVo to iPhone 7 supported file format. After fetching TiVo recovered shows and transfers them to your PC, you can take the aid of a safe and versatile movie/video converter tool- Dimo Video Converter Ultimate, to help you easily remove DRM from Tivo recordings or Tivo shows automatically and convert TiVo shows to iPhone 7/iTunes supported video keeping original quality as it provides the optimal presets for iPhone 7, iPhone 7 Plus, iPhone SE, iPhone 6S, iPhone 6S Plus, etc.. Besides, you are allowed to edit the videos by trimming, cropping, adjust video effects, etc to get the wanted part and effects as you like. More than TiVo files, it can also support ripping Blu-ray/DVD, encoding MKV, WMV, AVI, FLV, MPG, VOB, MP4 and even compressing 4K to iPhone 7 to meet your different needs. For Mac users, please get Dimo Video Converter Ultimate for Mac. Learn how to do Tivo conversion for iPhone 7 with only four steps that save you a much time and effort. Free Download Dimo Video Converter Ultimate (Win/Mac): Other Download:
Convert and Transfer Tivo to iPhone 7 for playback Step 1: Enter TiVo Media Access Key Start up this program, drag & drop TiVo videos to the program. Or click "Add file" to import .tivo file to the top Tivo Converter for iPhone 7. When first loading, this app will ask you to input your Media Access Key.
From what I have seen on the Tivo blogs, neither iTunes nor iPhone 7 is not compatible with Tivo files since all TiVo files are DRM protected. This is why iPhone 7 can't recognize TiVo from iTunes directly. Don't worry. Let's try some easier and quicker way here: transcode TiVo to iPhone 7 supported file format. After fetching TiVo recovered shows and transfers them to your PC, you can take the aid of a safe and versatile movie/video converter tool- Dimo Video Converter Ultimate, to help you easily remove DRM from Tivo recordings or Tivo shows automatically and convert TiVo shows to iPhone 7/iTunes supported video keeping original quality as it provides the optimal presets for iPhone 7, iPhone 7 Plus, iPhone SE, iPhone 6S, iPhone 6S Plus, etc.. Besides, you are allowed to edit the videos by trimming, cropping, adjust video effects, etc to get the wanted part and effects as you like. More than TiVo files, it can also support ripping Blu-ray/DVD, encoding MKV, WMV, AVI, FLV, MPG, VOB, MP4 and even compressing 4K to iPhone 7 to meet your different needs. For Mac users, please get Dimo Video Converter Ultimate for Mac. Learn how to do Tivo conversion for iPhone 7 with only four steps that save you a much time and effort. Free Download Dimo Video Converter Ultimate (Win/Mac): Other Download:
Convert and Transfer Tivo to iPhone 7 for playback Step 1: Enter TiVo Media Access Key Start up this program, drag & drop TiVo videos to the program. Or click "Add file" to import .tivo file to the top Tivo Converter for iPhone 7. When first loading, this app will ask you to input your Media Access Key.  Simply enter your Media Access Key, and click "OK" to confirm. Tip: How to find your Media Access Key on TiVo: Go to "TiVo Central" menu >> "Messages and Set Up" "Account and System Information", and your Media Access Key would be there. Step 2: Add TiVo video files
 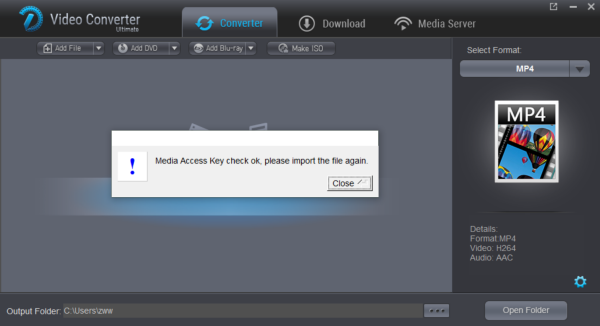 After being checked, click Click "Add file" button again to import TiVo shows to the TiVo convert tool for converting.
 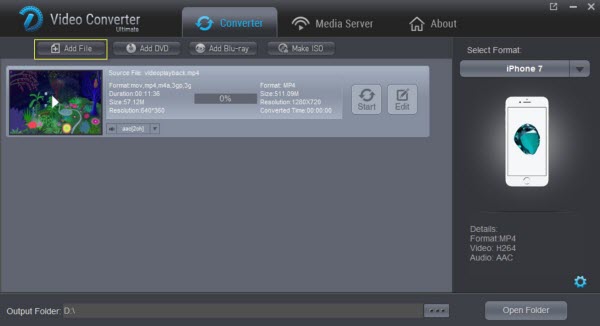 Step 3: Select output format Being a user-friendly iPhone 7 video converter, Dimo Video Converter Ultimate has already designed a special output for iPhone equipment. Click "Select Format" and select "Device > Apple > iPhone 7" as output profile for your iPhone 7 device. Tip: Profile Settings (Optional) The default settings may not satisfy you, and you can click the settings button to change the settings by yourself including video resolution, bit rate, audio sample rate, audio channel etc. for full screen playback smoothly.
  Step 4: Start the conversion Press "Start" button to begin encoding TiVo shows to iPhone 7. After conversion completes you can click "Open" to find converted and copy TV shows to your iPhone 7 for carrying along with. Additional Tips: How to Transfer TV shows from TiVo to PC It takes a while depending on length of TV program you are transferring. Make sure your TiVo and computer are in the same home network, and follow this guide to proceed TiVo file transfer: 1. On your PC, launch TiVo Desktop for PC, the freeware that transfers shows from your networked TiVo box to your computer. 2. Click "Pick Recordings to Transfer." A window showing your TiVo box's "Now Playing" or "My Shows" list appears.
  3. Highlight any title in the list to see more information about the show. Check the box next to the title of the show (or shows) you want to transfer. 4. Click "Start Transfer." Transfer times vary, but may take as long as the show's duration to complete the transfer. Free Download or Purchase Dimo Video Converter Ultimate: Need the lifetime version to work on 2-4 PCs so that your friends and family can instantly broaden their entertainment options? Please refer to the family license here. Kindly Note: The price of Dimo Video Converter Ultimate for Windows is divided into 1 Year Subscription, Lifetime/Family/Business License: $43.95/Year; $45.95/lifetime license; $95.95/family license(2-4 PCs); $189.95/business pack(5-8 PCs). Get your needed one at purchase page. Related Software: BDmate (Win/Mac) Lossless backup Blu-ray to MKV with all audio and subtitle tracks; Rip Blu-ray to multi-track MP4; ConvertBlu-ray to almost all popular video/audio formats and devices; Copy Blu-ray to ISO/M2TS; Share digitized Blu-ray wirelessly. DVDmate (Win/Mac) A professional DVD ripping and editing tool with strong ability to remove DVD protection, transcode DVD to any video and audio format, and edit DVD to create personal movie. Videomate (Win/Mac) An all-around video converter software program that enables you to convert various video and audio files to formats that are supported by most multimedia devices. 8K Player (Win/Mac) A mixture of free HD/4K video player, music player, Blu-ray/DVD player, video recorder and gif maker. Contact us or leave a message at Facebook if you have any issues. Related Articles:
Source: Rip and Transfer DVD movies to TiVo from PC/Mac
3. Highlight any title in the list to see more information about the show. Check the box next to the title of the show (or shows) you want to transfer. 4. Click "Start Transfer." Transfer times vary, but may take as long as the show's duration to complete the transfer. Free Download or Purchase Dimo Video Converter Ultimate: Need the lifetime version to work on 2-4 PCs so that your friends and family can instantly broaden their entertainment options? Please refer to the family license here. Kindly Note: The price of Dimo Video Converter Ultimate for Windows is divided into 1 Year Subscription, Lifetime/Family/Business License: $43.95/Year; $45.95/lifetime license; $95.95/family license(2-4 PCs); $189.95/business pack(5-8 PCs). Get your needed one at purchase page. Related Software: BDmate (Win/Mac) Lossless backup Blu-ray to MKV with all audio and subtitle tracks; Rip Blu-ray to multi-track MP4; ConvertBlu-ray to almost all popular video/audio formats and devices; Copy Blu-ray to ISO/M2TS; Share digitized Blu-ray wirelessly. DVDmate (Win/Mac) A professional DVD ripping and editing tool with strong ability to remove DVD protection, transcode DVD to any video and audio format, and edit DVD to create personal movie. Videomate (Win/Mac) An all-around video converter software program that enables you to convert various video and audio files to formats that are supported by most multimedia devices. 8K Player (Win/Mac) A mixture of free HD/4K video player, music player, Blu-ray/DVD player, video recorder and gif maker. Contact us or leave a message at Facebook if you have any issues. Related Articles:
Source: Rip and Transfer DVD movies to TiVo from PC/Mac